

How To Connect Lan Printer To Shopify App
Connect Tablet/PC
Connect the printer to a tablet or PC, and configure wireless LAN settings for the printer and/or static IP address settings.
Once a static IP address is assigned to the printer, IP address changes through the DHCP server will not occur, so the specified connection destination device can be used continuously once set.
The connection method depends on the operating system of the device you are using.
Connect from an iOS device
Connect from an Android device
Connect from a Windows device
Connect to the printer and configure wireless LAN settings of the printer from WebConfiguration.
Printer wireless LAN settings / Static IP address settings
Connect from an iOS device
If your network uses DHCP and your router or wireless LAN access point supports WPS*, connecting with WPS* is convenient.
Also, connecting with AP mode (Access Point Mode) is also possible. In AP mode, the printer becomes a simple access point and devices such as wireless LAN tablets can connect directly to the printer. If DHCP or WPS cannot be used, first connect in AP mode to configure wireless LAN settings for the printer in order to allow the printer to connect to a wireless LAN network.
Depending on the firmware version of the printer, AP mode cannot be used. Perform the steps in Connect with Ad-Hoc.
How to check for network modes that are available
The following steps must be performed after the power of the printer has been turned on. Turn power on
Connect by WPS
Connect with AP mode
WPS*
A standard that makes it easier for wireless LAN devices to connect to each other.
Depending on the manufacturer, buttons such as "AOSS", "Rakuraku wireless start" and "JumpStart" may have the same functionality as WPS.
For details, refer to the documentation of the corresponding device.
Connect by WPS
If you are using DHCP (static IP address is not set), the connection is established if step 1 is completed.
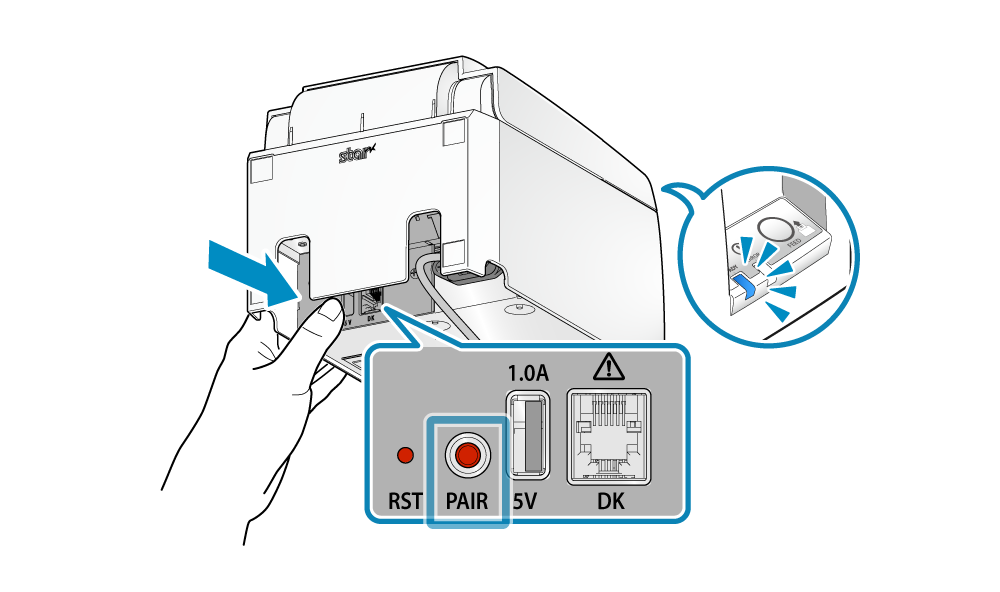
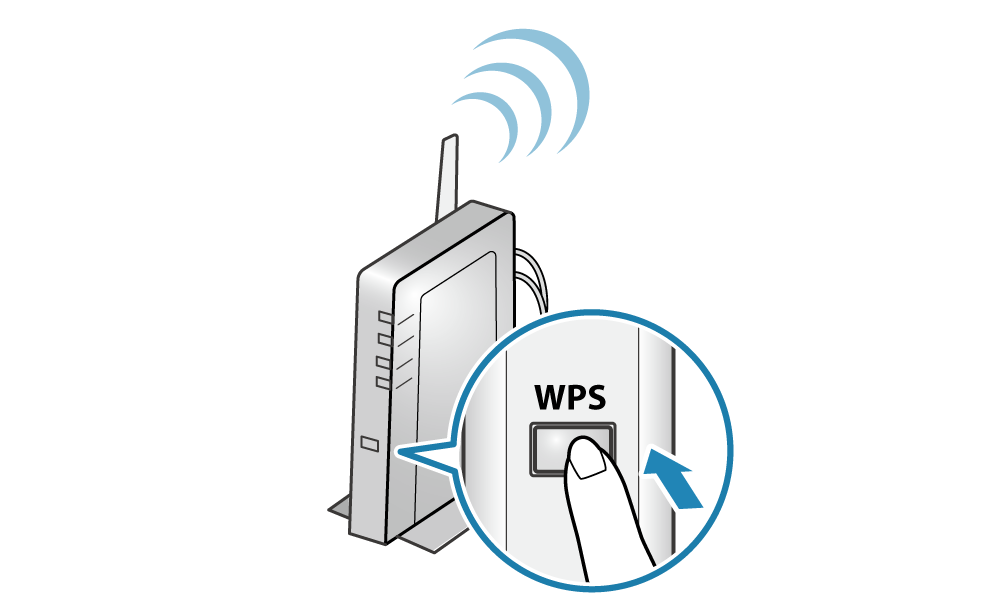
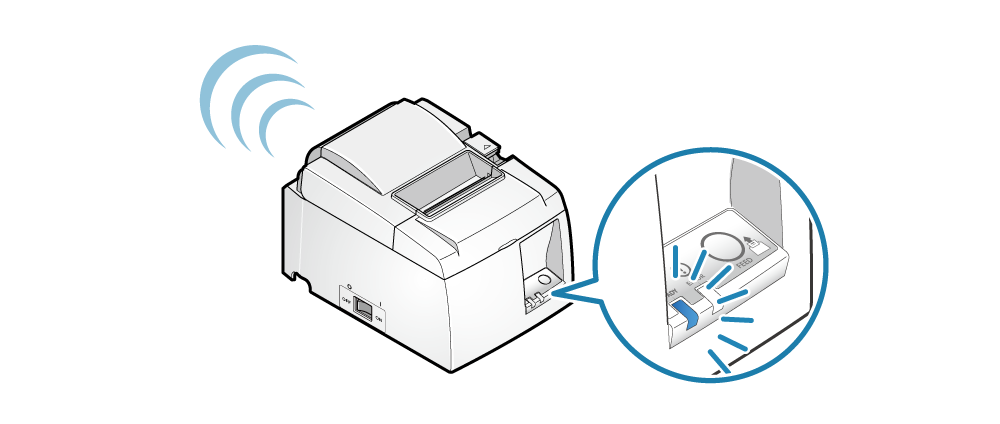
1. Connect to the network
- Press and hold the PAIR button until the LED (blue) button of the printer blinks.
- Press the WPS button of the access point or router.
- When a network connection is established, print out the connection details, and the LED of the printer will stop blinking and stay lit.
Note
The usage procedure of the access point or router will vary according to the device.
When configuring, make sure to refer to the documentation of the corresponding device.
When connection cannot be established
Try reconnecting from the beginning of step 1.
If you are unable to connect, please refer to FAQ - Cannot connect to network.
2. Prepare the Utility
- Use "TSP100III Utility" to connect the printer and the tablet.
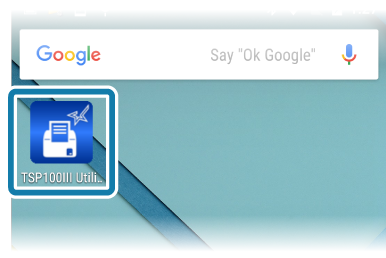
"TSP100III Utility" can be downloaded from the following link, Use App. - Open the setting screen of the tablet and select WiFi and turn it ON.
3. Select the printer from TSP100III Utility, and open the setting screen
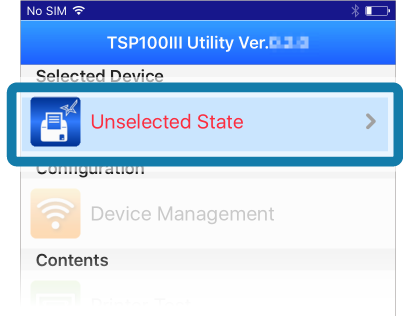
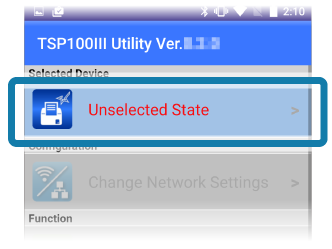
- Check the printer's power is on, and open TSP100III Utility.
- Tap [Unselected State] from "Selected Device".
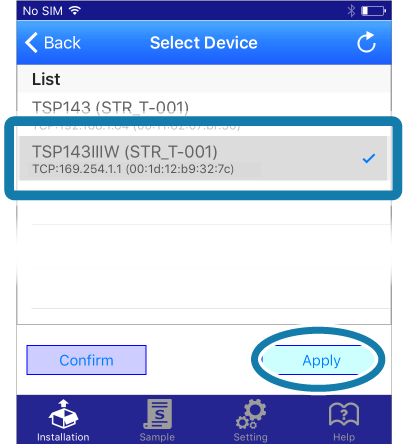
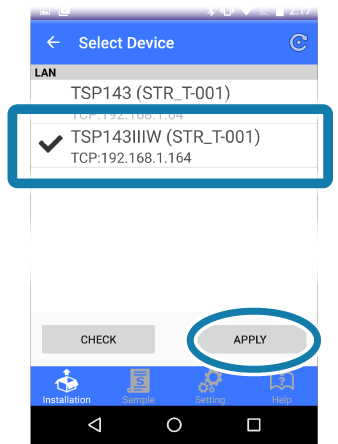
- From the Select Device list , select the device you want to connect and then tap [Apply].
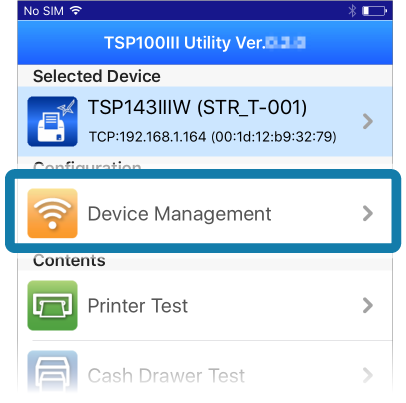
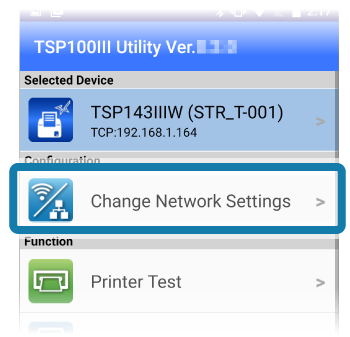
- Tap [Change Network Settings].
This connects to the selected printer and opens the Web Configuration.
Note
If there is a printer that has already been selected, tap the printer that is displayed in "Selected Device".
Note
Tap [Confirm] and the printer's LED (blue) will flash, and you can check the selected printer.

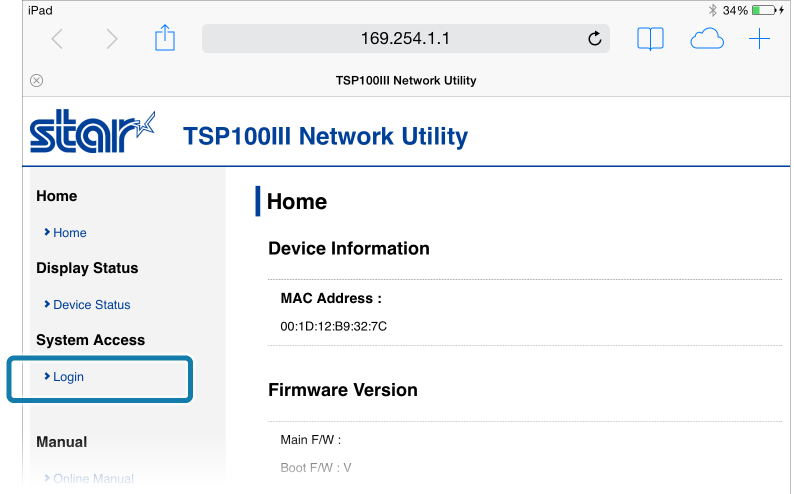
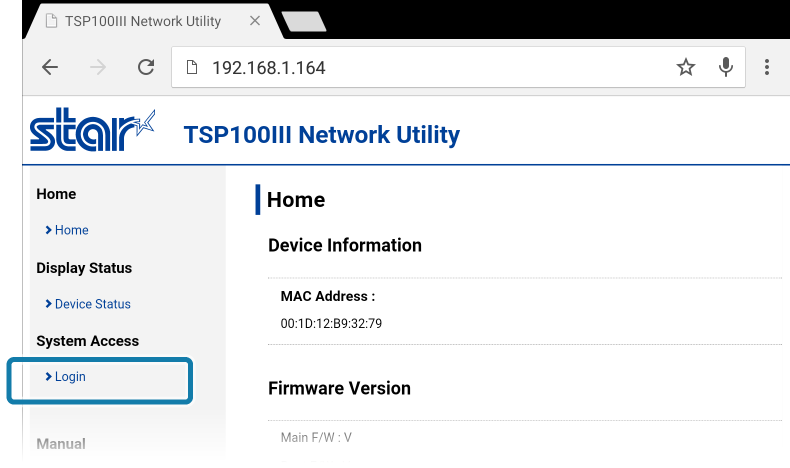
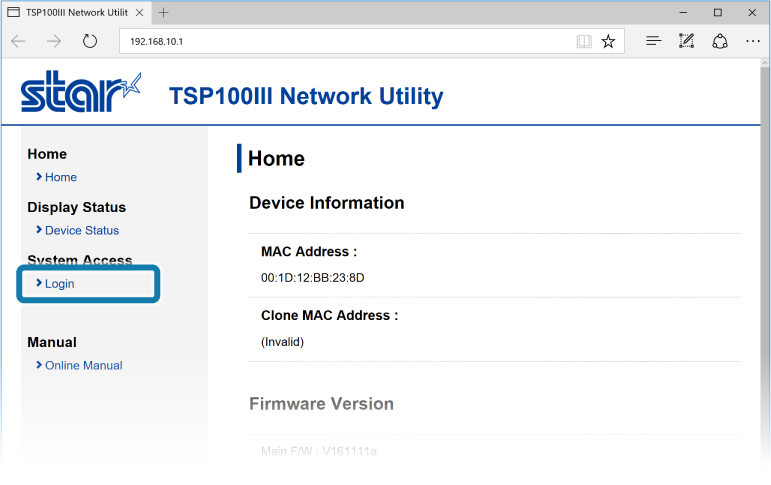
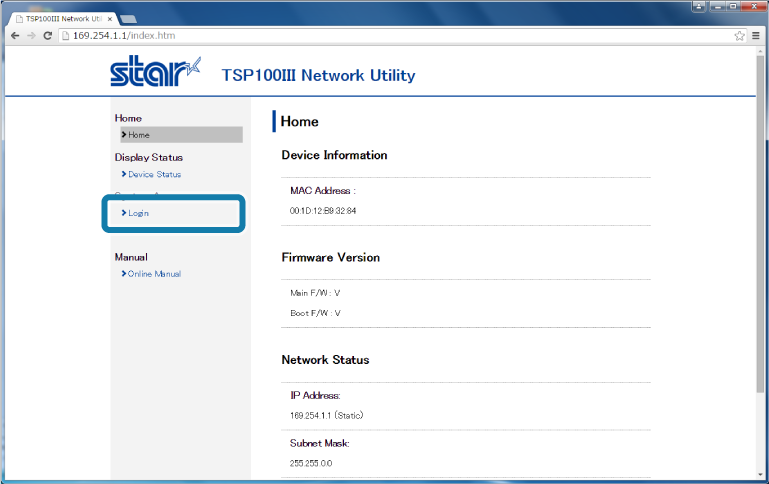
4. Log into Web Configuration
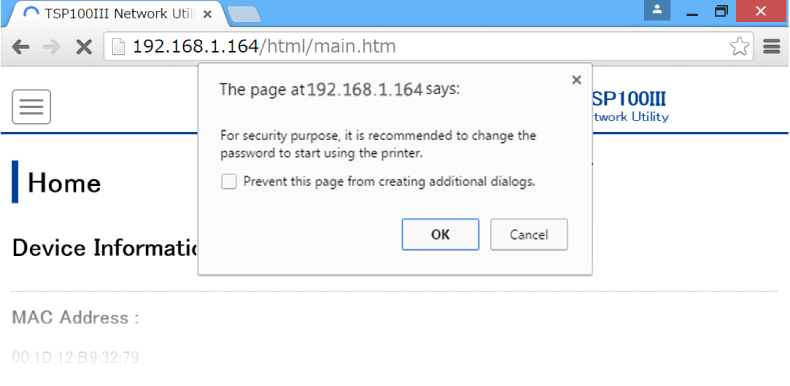
- If you have changed the password, open [Login] from the menu displayed on the left side of the setting screen, or the menu button displayed on the upper left, and login with: Login name: root / password: [Changed password or the default password (public)].
- The default login name and password are as follows:
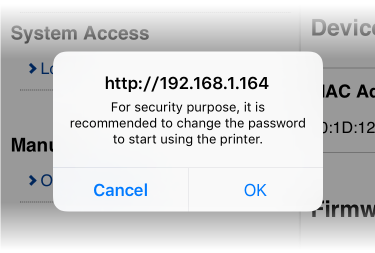
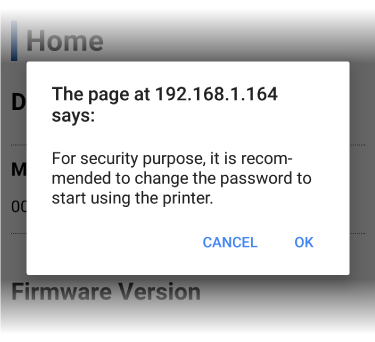
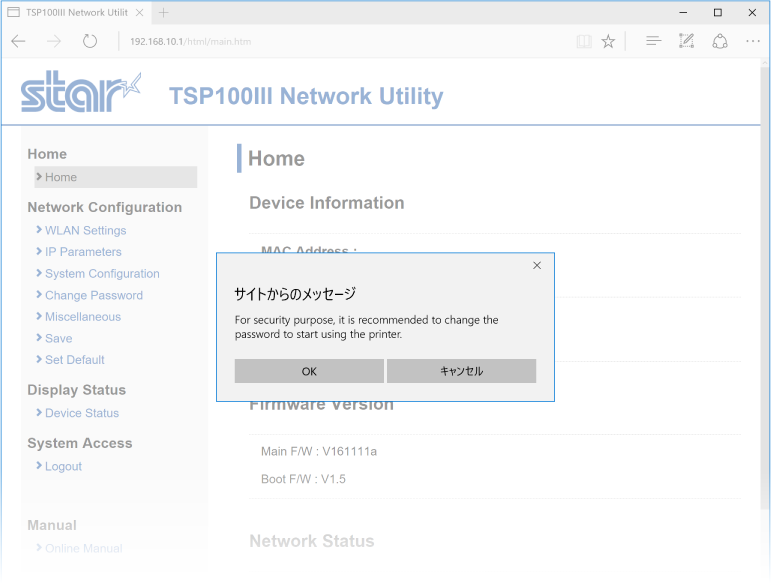
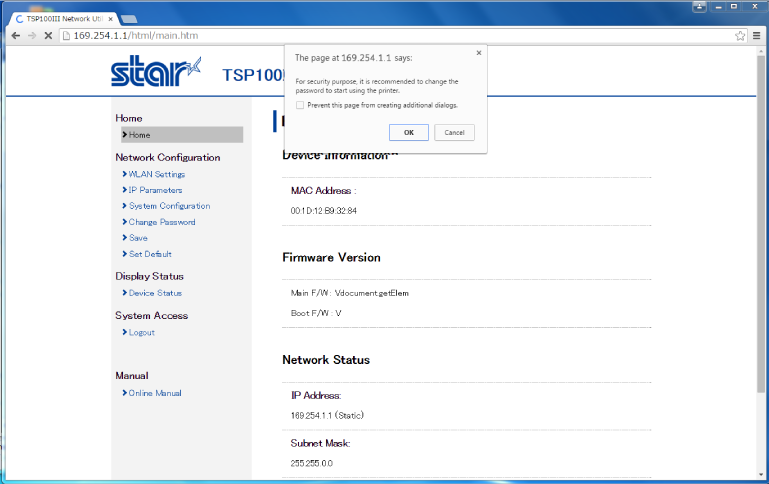
- The following message is displayed when you are using the default password. Select [OK] to change the password or [Cancel] to not change the password.
If [OK] is selected, a screen to change the password will appear. After changing the password, continue to the following step.


Note
Login name: root
Password: public
Note
For security purposes, it is recommended to change the password when using the printer.
Printer wireless LAN settings / Static IP address settings
Connect with AP mode
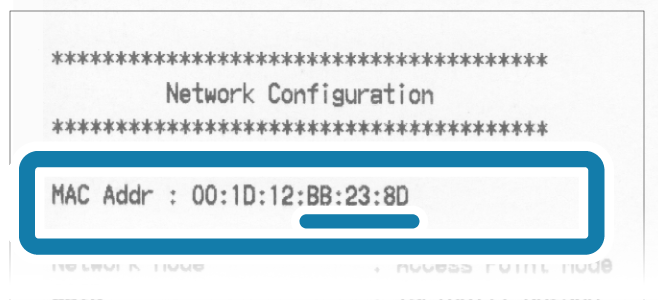
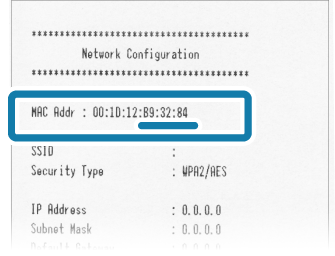
1. Check the MAC address of the printer
- You can check the MAC address from "Network Configuration" found in the Self-Printing printout.
- Wait while the power of the printer is still on.
Note
In the initial settings, the printer will start in AP mode or Ad-Hoc mode.
The SSID for AP mode and Ad-Hoc mode is: "TSP100III-XXXXXX (XXXXXX is the last 6 digits of the MAC address)".

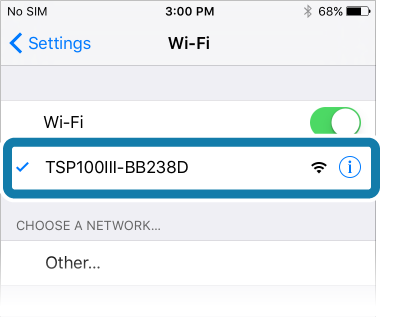
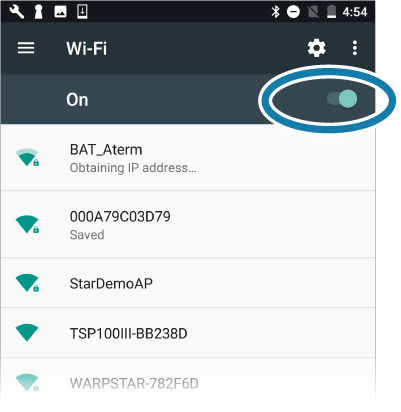
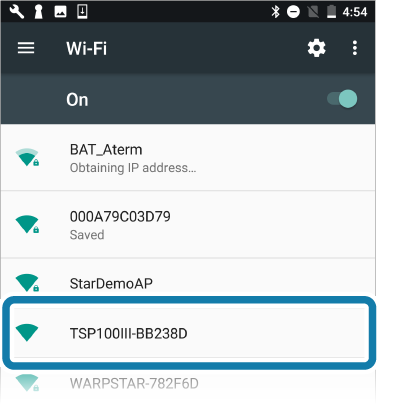
2. Connect the tablet to the printer
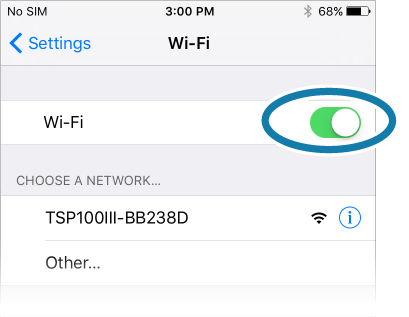
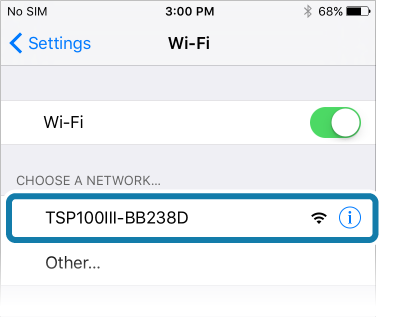
- Open the setting screen of the tablet and select Wi-Fi to enable Wi-Fi.
- From the device list that appears under "Select Network...", refer to the last 6 digits of the MAC address confirmed in step 1 and select the device to connect.
- When a connection is established, the SSID will appear under Wi-Fi with a check mark.
Note
When connecting with AP mode, Internet access is not available.
3. Log into Web Configuration
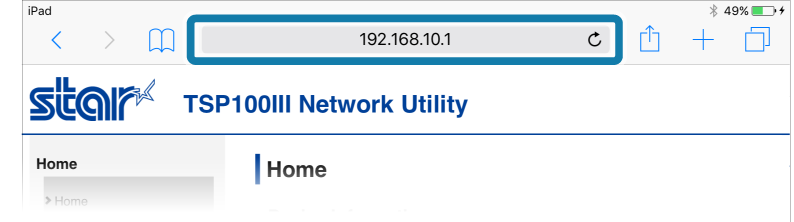
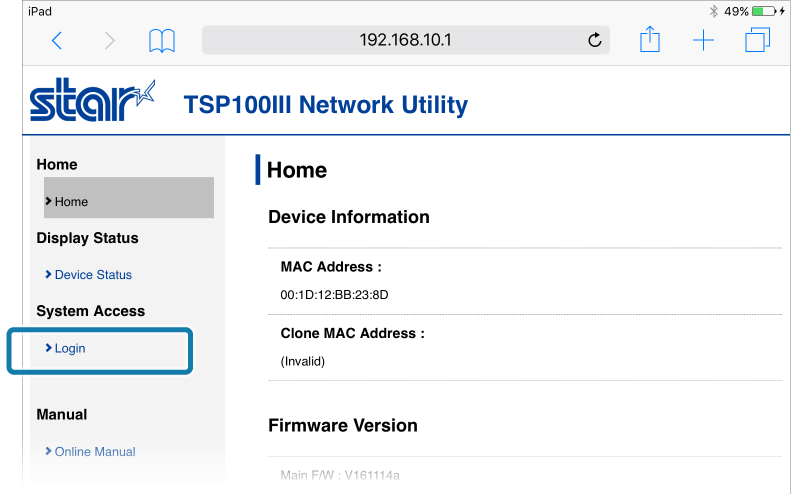
- Open a browser such as Safari and enter 192.168.10.1 in the address field (If the IP address of the printer was changed in AP mode, enter the IP address that appears under "Current IP Parameters Status" in the Self-Printing printout) and open Web Configuration.
- Open [Login] from the menu displayed on the left side of the setting screen, or the menu button displayed on the upper left, and login with: Login name: root / password: [Changed password or the default password (public)].
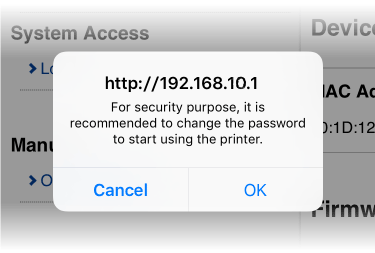
- The following message is displayed when you are using the default password. Select [OK] to change the password or [Cancel] to not change the password.
If [OK] is selected, a screen to change the password will open. After changing the password, return to the following step.


Note
The default login name and password are as follows:
Login name: root
Password: public
Note
For security purposes, it is recommended to change the password when using the printer.
Printer wireless LAN settings / Static IP address settings
Ad-Hoc connection settings
1. Check the MAC address of the printer
- You can check the MAC address from "Network Configuration" found in the Self-Printing printout.
- Wait while the power of the printer is still on.

Note
In the initial settings, the printer will start in AP mode or Ad-Hoc mode.
The SSID for AP mode and Ad-Hoc mode is: "TSP100III-XXXXXX (XXXXXX is the last 6 digits of the MAC address)".

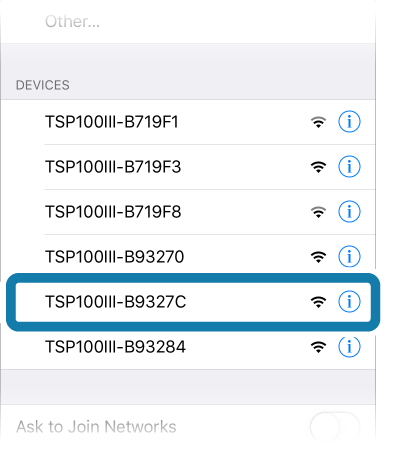
2. Connect the tablet to the printer
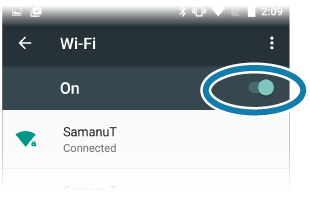
- Open the setting screen of the tablet and select WiFi and turn it ON.
- From the device list that appears at the bottom, refer to the last 6 digits of the MAC address confirmed in step 1 and select the device to connect.
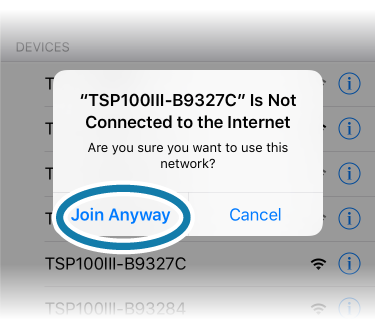
- A message appears indicating that connection to the Internet fails. Tap "register".
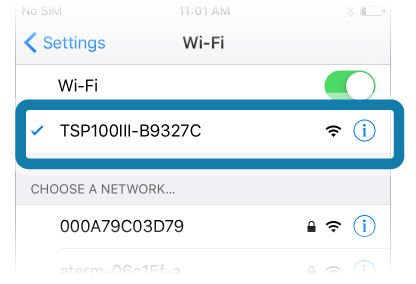
- The SSID will appear under Wi-Fi with a check mark.
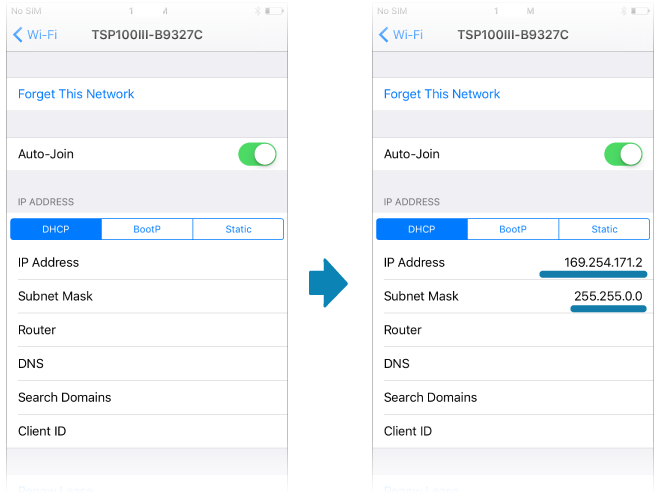
- If you tap the SSID, the IP address, subnet mask will appear in each properties screen. If there are values in each item, the connection is complete.
Note
When connecting with Ad-Hoc mode, Internet access is not available.
Note
It make take some time (around 1 minute) for the IP address and subnet mask values to appear.
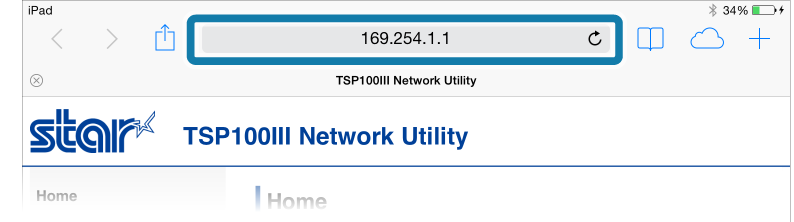
3. Log into Web Configuration
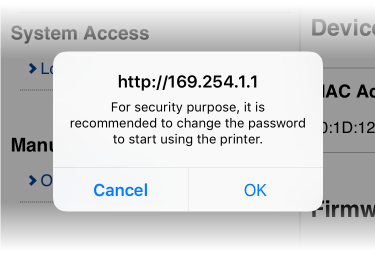
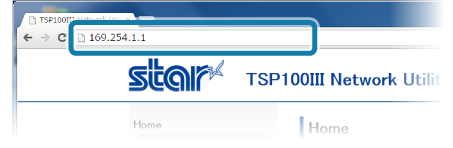
- Open a browser such as Safari and enter 169.254.1.1 in the address (static IP address during Ad-Hoc mode) to open Web Configuration.
- Open [Login] from the menu displayed on the left side of the setting screen, or the menu button displayed on the upper left, and login with: Login name: root / password: [Changed password or the default password (public)].
- The following message is displayed when you are using the default password. Select [OK] to change the password or [Cancel] to not change the password.
If [OK] is selected, a screen to change the password will open. After changing the password, return to the following step.


Note
The default login name and password are as follows:
Login name: root
Password: public
Note
For security purposes, it is recommended to change the password when using the printer.
Printer wireless LAN settings / Static IP address settings
Connect from an Android device
If your network uses DHCP and your router or wireless LAN access point supports WPS*, connecting with WPS* is convenient.
Also, connecting with AP mode (Access Point Mode) is also possible. In AP mode, the printer becomes a simple access point and devices such as wireless LAN tablets can connect directly to the printer. If DHCP or WPS cannot be used, first connect in AP mode to configure wireless LAN settings for the printer in order to allow the printer to connect to a wireless LAN network.
Depending on the firmware version of the printer, AP mode cannot be used. Regarding firmware updates, consult our local distributor.
How to check for network modes that are available
The following steps must be performed after the power of the printer has been turned on. Turn power on
Connect by WPS
Connect with AP mode
WPS*
A standard that makes it easier for wireless LAN devices to connect to each other.
Depending on the manufacturer, buttons such as "AOSS", "Rakuraku wireless start" and "JumpStart" may have the same functionality as WPS.
For details, refer to the documentation of the corresponding device.
Connect by WPS
If you are using DHCP (static IP address is not set), the connection is established if step 1 is completed.
1. Connect to the network
Note
The usage procedure of the access point or router will vary according to the device.
When configuring, make sure to refer to the documentation of the corresponding device.
- When a network connection is established, print out the connection details, and the LED of the printer will stop blinking and stay lit.
When connection cannot be established
Try reconnecting from the beginning of step 1.
If you are unable to connect, please refer to FAQ - Cannot connect to network.
2. Prepare the Utility
- Use "TSP100III Utility" to connect the printer and the tablet.
"TSP100III Utility" can be downloaded from the following link, Use App. - Open the setting screen of the tablet and select WiFi and turn it ON.
3. Select the printer from TSP100III Utility, and open the setting screen
- Check the printer's power is on, and open TSP100III Utility.
- Tap [Unselected State] from "Selected Device".
- From the Select Device list , select the device you want to connect and then tap [Apply].
- Tap [Change Network Settings].
This connects to the selected printer and opens the Web Configuration.
Note
If there is a printer that has already been selected, tap the printer that is displayed in "Selected Device".
Note
Tap [Confirm] and the printer's LED (blue) will flash, and you can check the selected printer.

4. Log into Web Configuration
- If you have changed the password, open [Login] from the menu displayed on the left side of the setting screen, or the menu button displayed on the upper left, and login with: Login name: root / password: [Changed password or the default password (public)].
- The default login name and password are as follows:
- The following message is displayed when you are using the default password. Select [OK] to change the password or [Cancel] to not change the password.
If [OK] is selected, a screen to change the password will open. After changing the password, return to the following step.


Note
Login name: root
Password: public
Note
For security purposes, it is recommended to change the password when using the printer.
Printer wireless LAN settings / Static IP address settings
Connect with AP mode
1. Check the MAC address of the printer
- You can check the MAC address from "Network Configuration" found in the Self-Printing printout.
- Wait while the power of the printer is still on.
Note
In the initial settings, the printer will start in AP mode or Ad-Hoc mode.
The SSID for AP mode and Ad-Hoc mode is: "TSP100III-XXXXXX (XXXXXX is the last 6 digits of the MAC address)".

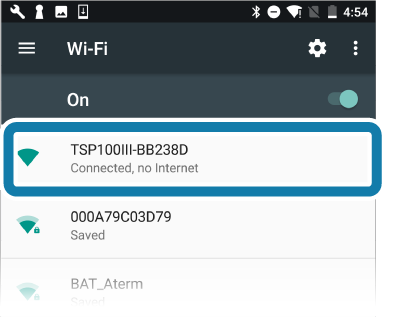
2. Connect the tablet to the printer
- Open the setting screen of the tablet and select Wi-Fi to enable Wi-Fi.
- From the device list, refer to the last 6 digits of the MAC address confirmed in step 1 and select the device to connect.
- Once connected, "Connected" will appear under the SSID indicating that the connection is established.
Note
When connecting with AP mode, Internet access is not available.
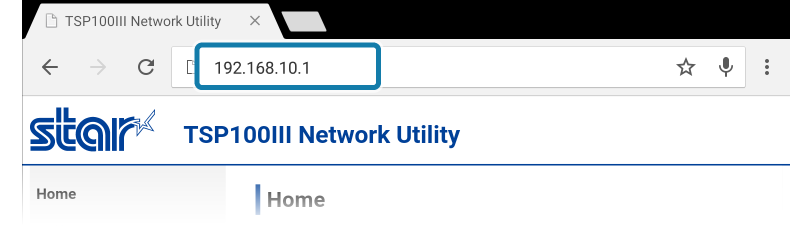
3. Log into Web Configuration
- Open a browser such as Safari and enter 192.168.10.1 in the address field (If the IP address of the printer was changed in AP mode, enter the IP address that appears under "Current IP Parameters Status" in the Self-Printing printout) and open Web Configuration.
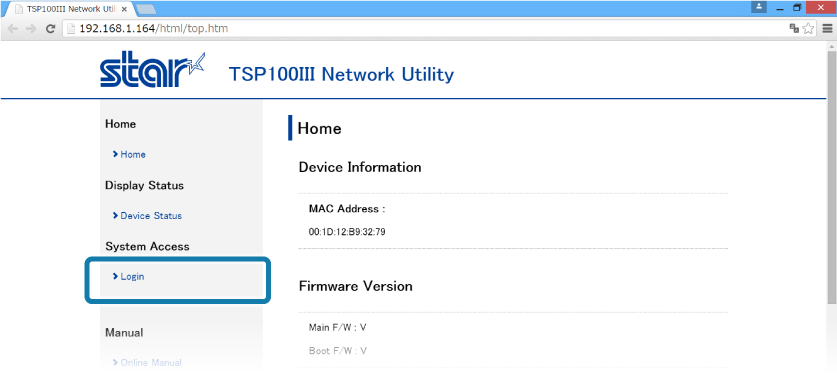
- Open [Login] from the menu displayed on the left side of the setting screen, or the menu button displayed on the upper left, and login with: Login name: root / password: [Changed password or the default password (public)].
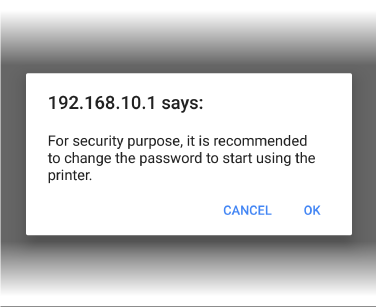
- The following message is displayed when you are using the default password. Select [OK] to change the password or [Cancel] to not change the password.
If [OK] is selected, a screen to change the password will open. After changing the password, return to the following step.


Note
The default login name and password are as follows:
Login name: root
Password: public
Note
For security purposes, it is recommended to change the password when using the printer.
Printer wireless LAN settings
Connect from a Windows device
If your network uses DHCP and your wireless LAN access point or router or supports WPS*, connecting with WPS* is convenient.
Also, connecting with AP mode (Access Point Mode) is also possible. In AP mode, the printer becomes a simple access point and devices such as wireless LAN tablets can connect directly to the printer. If DHCP or WPS cannot be used, first connect in AP mode to configure wireless LAN settings for the printer in order to allow the printer to connect to a wireless LAN network.
Depending on the firmware version of the printer, AP mode cannot be used. If you are using Windows 7, perform the settings in Connect with Ad-Hoc. Regarding firmware updates, consult our local distributor.
How to check for network modes that are available
The following steps must be performed after the power of the printer has been turned on. Turn power on
Connect by WPS
Connect with AP mode
WPS*
A standard that makes it easier for wireless LAN devices to connect to each other.
Depending on the manufacturer, buttons such as "AOSS", "Rakuraku wireless start" and "JumpStart" may have the same functionality as WPS.
For details, refer to the documentation of the corresponding device.
Connect by WPS
If you are using DHCP (static IP address is not set), the connection is established if step 1 is completed.
1. Connect to the network
Note
The usage procedure of the access point or router will vary according to the device.
When configuring, make sure to refer to the documentation of the corresponding device.
- When a network connection is established, print out the connection details, and the LED of the printer will stop blinking and stay lit.
When connection cannot be established
Try reconnecting from the beginning of step 1.
If you are unable to connect, please refer to FAQ - Cannot connect to network.
2. Prepare the Utility
- Use "LAN & Bluetooth Settings Tool" to connect the printer and the PC/tablet. It is installed at the same time as the Windows printer driver (futurePRNT) is installed, and "LAN & Bluetooth Settings Tool" can also be downloaded and installed separately.
Download from the following link Use App - Windows. - Check if the tablet and PC are connected in the same network.

3. Select the printer in LAN & Bluetooth setup tool and open the settings screen
4. Log into Web Configuration
- Open [Login] from the menu displayed on the left side of the setting screen, or the menu button displayed on the upper left, and login with: Login name: root / password: [Changed password or the default password (public)].
- The following message is displayed when you are using the default password. Select [OK] to change the password or [Cancel] to not change the password.
If [OK] is selected, a screen to change the password will open. After changing the password, return to the following step.


Note
The default login name and password are as follows:
Login name: root
Password: public
Note
For security purposes, it is recommended to change the password when using the printer.
Printer wireless LAN settings / Static IP address settings
Connect with AP mode
1. Check the MAC address of the printer
- You can check the MAC address from "Network Configuration" found in the Self-Printing printout.
- Wait while the power of the printer is still on.
Note
In the initial settings, the printer will start in AP mode or Ad-Hoc mode.
The SSID for AP mode and Ad-Hoc mode is: "TSP100III-XXXXXX (XXXXXX is the last 6 digits of the MAC address)".

2. Connect the PC to the printer
Note
When connecting with AP mode, Internet access is not available.
3. Log into Web Configuration
- Open a browser such as Internet Explorer and enter 192.168.10.1 in the address field (If the IP address of the printer was changed in AP mode, enter the IP address that appears under "Current IP Parameters Status" in the Self-Printing printout) and open Web Configuration.
- Open [Login] from the menu displayed on the left side of the setting screen, or the menu button displayed on the upper left, and login with: Login name: root / password: [Changed password or the default password (public)].
- The following message is displayed when you are using the default password. Select [OK] to change the password or [Cancel] to not change the password.
If [OK] is selected, a screen to change the password will open. After changing the password, return to the following step. - You can check the MAC address from "Network Configuration" found in the Self-Printing printout.
- Wait while the power of the printer is still on.
- It make take some time (around 1 minute) for the ad-hoc connection to establish.
- When connecting with AP mode, Internet access is not available.
- Open a browser such as Internet Explorer and enter 169.254.1.1 in the address (static IP address during Ad-Hoc mode) to open Web Configuration.
- Open [Login] from the menu displayed on the left side of the setting screen, or the menu button displayed on the upper left, and login with: Login name: root / password: [Changed password or the default password (public)].
- The following message is displayed when you are using the default password. Select [OK] to change the password or [Cancel] to not change the password.
If [OK] is selected, a screen to change the password will open. After changing the password, return to the following step. - Set the network information of the network to the printer.
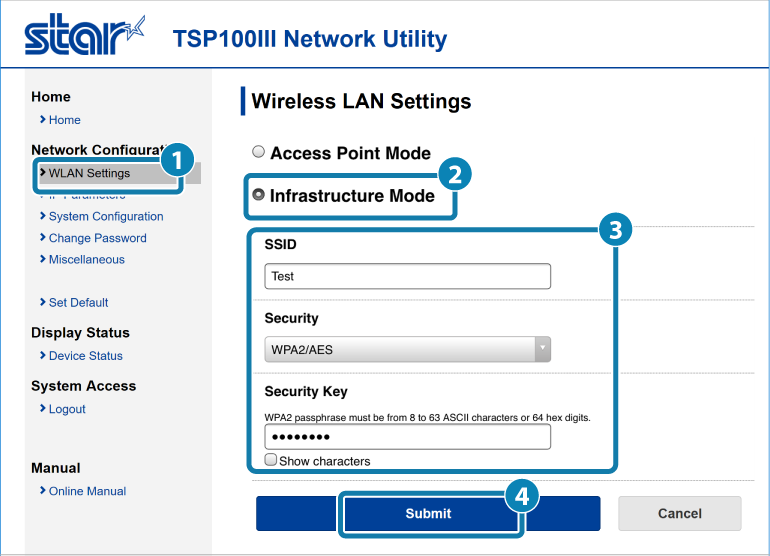
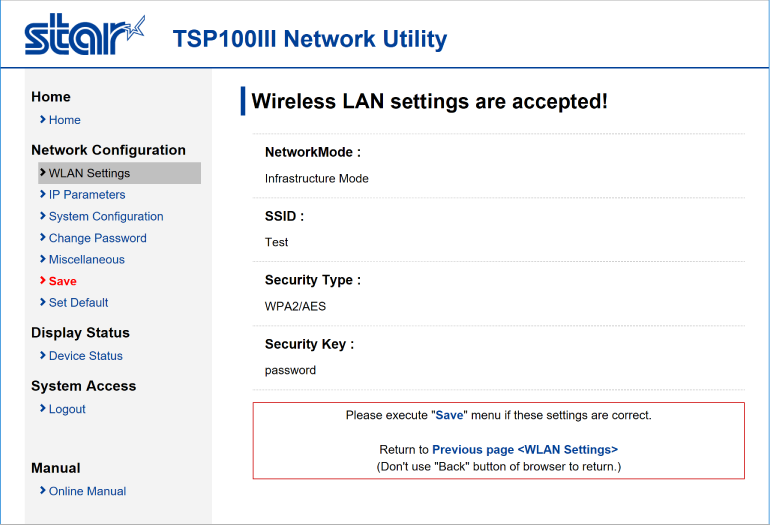
- From the menu displayed in the left side of the settings or the menu button in the upper left, open "WLAN Settings"
 , select "Infrastructure Mode
  ", enter SSID, Security, Security Key
  , and tap "Submit"
 .
. - Ask your network administrator about the values for the SSID, Security, and Security Key.
- If "Access Point Mode" is selected from , SSID, Security, and Security Key for AP mode will be set for the printer.
- A screen where you can check and save the entered details will appear.
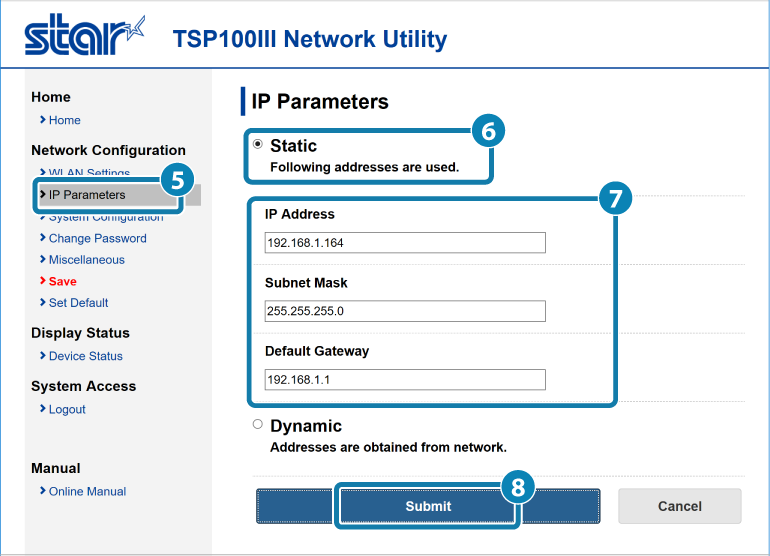
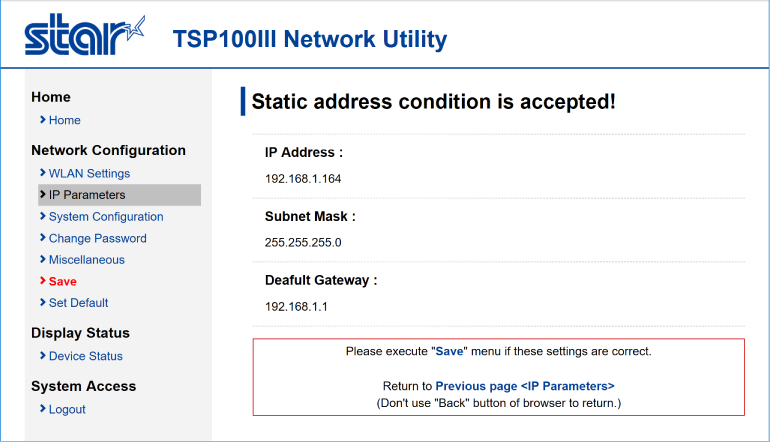
For now, do not save and continue to the next step. - From the menu or the menu button in the upper left, open "IP Parameters"
 , select "Static
  ", enter IP Address, Subnet Mask
  , and tap "Submit"
  .
. - Ask your network administrator about the static IP address and subnet mask to use in the settings.
- If "Access Point Mode" is selected from , "IP Parameters" will be the IP address setting screen for AP mode of the printer.
- A screen where you can check and save the entered details will appear.
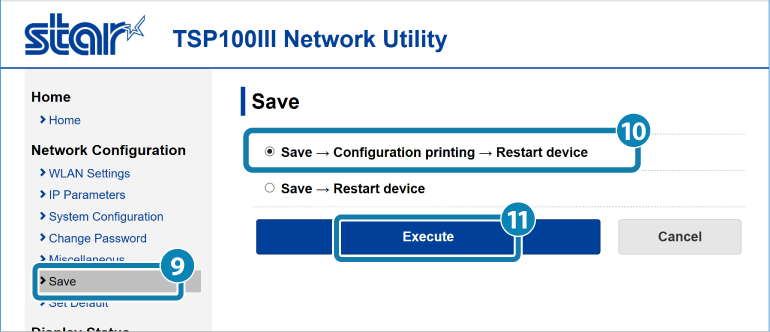
- From the menu or menu button in the upper left, open "Save"
 , select "Save""Configuration Printing""Restart device"
  , and tap "Execute"
  .
.
The settings are saved to the printer and printed out.


Note
The default login name and password are as follows:
Login name: root
Password: public
Note
For security purposes, it is recommended to change the password when using the printer.
Printer wireless LAN settings / Static IP address settings
Connect with Ad-Hoc mode - Windows 7 only -
1. Check the MAC address of the printer
Note
In the initial settings, the printer will start in Ad-Hoc mode.
The SSID for Ad-Hoc mode is: "TSP100III-XXXXXX (XXXXXX is the last 6 digits of the MAC address)".

2. Connect the PC to the printer
Note
3. Log into Web Configuration

Note
The default login name and password are as follows:
Login name: root
Password: public
Note
For security purposes, it is recommended to change the password when using the printer.
Printer wireless LAN settings / Static IP address settings
Printer wireless LAN settings / Static IP address settings
Configure wireless LAN settings of the printer and static IP address settings after logging into WebConfiguration.
If WPS is used when logging in, "1. Set wireless LAN settings" does not need to be performed because it will done automatically.
1. Set wireless LAN settings
2. Set static IP address
3. Save settings to printer
1. Set wireless LAN settings
Note
2. Set static IP address
Note
3. Save settings to printer
Note
When the printer settings is completed, the AP mode and Ad-Hoc connections are disconnected.
Return the network settings of the tablet back to its previous settings.
How to check for network modes that are available
You can check it from "Network Mode" field under "Network Configuration" (printed out on the 2nd page of the self-printing printout).
Self-Printing

After turning on the power, connections will be in standby in AP mode.
All supported operating systems can be connected.
Return to link source

After turning on the power, connections will be in standby in Ad-Hoc mode.
Can be connected from iOS and Windows 7 devices.
Return to link source

Wireless connection items such as the printer SSID and static IP address are set.
After turning on the power, connections will be attempted according to the settings.
Return to link source
How To Connect Lan Printer To Shopify App
Source: https://www.star-m.jp/products/s_print/tsp100iiiw/manual/en/settings/settingsWLAN.htm
Posted by: walkerwhoduch.blogspot.com
0 Response to "How To Connect Lan Printer To Shopify App"
Post a Comment